Fluidinfo

January 27, 2011

How we made an API for BoingBoing in an evening

Filed under: Awesomeness,Essence,Howto,Programming,Progress — Nicholas Tollervey @ 9:05 am

Yesterday the folks over at boingboing.net posted eleven year’s worth of posts as a zipped up XML file. XML is good, but having a searchable database of posts is better. So I (ntoll) am in the process of importing all the data into Fluidinfo. 🙂

When finished, every post and author in the boingboing data dump will be represented by an object in Fluidinfo and tagged with useful information. The diagram below shows a representation of what a typical object about a boingboing.net post looks like:

Tags on an object representing a boingboing.net post.

The object (the red blob with a unique ID written inside it) has several tags attached to it (named “boingboing.net/author” and “boingboing.net/comment_count” for example) with associated values (“Mark Frauenfelder” and “53” respectively).

Furthermore, while I was cleaning/preparing the data for upload I made sure to extract every domain name and URL referenced in each post and annotate the publication date as computer friendly values rather than just a human readable date.

An instant win is the ability to query data. For example, you’ll be able to search for all posts that link to techcrunch.com written in 2010 by Cory Doctorow. This is how to write the query in Fluidinfo’s super simple query language:

boingboing.net/domains contains "techcrunch.com" and
boingboing.net/year = 2010 and
boingboing.net/author = "Cory Doctorow"

The result will depend on how you make the query, but let’s assume you’re using a /values based call in Fluidinfo’s REST api and you’ve asked for each post’s title, publication date and a list of domains mentioned. You’ll get back some JSON encoded data that looks something like this:

[
  "results" : {
        "id" : {
            "05eee31e-fbd1-43cc-9500-0469707a9bc3" : {
                "boingboing.net/title" : {
                    "value" : "This is a made up title for illustrative purposes"
                },
                "boingboing.net/created_on" : {
                    "value" : "2010-08-19 13:23:41"
                },
                "boingboing.net/domains" : {
                    "value": [ 
                        "techcrunch.com", 
                        "microsoft.com"
                    ]
                }
            },
            "0521e31e-fbd1-43cc-9500-046974569bc3" : {
               ... more results ...
            }
        }
    }
  }
]


api

Wait a minute..!?!? This is just as if boingboing.net had an API.

Actually, by importing the flat XML file into Fluidinfo they do have an API – for free! Because of Fluidinfo’s open nature anyone can now make use of boingboing’s data via a few simple and easy to construct RESTful calls to Fluidinfo.

But that’s not all..!

Fluidinfo isn’t just openly readable – it’s openly writeable too.

Huh..?

Any user of Fluidinfo can tag data to any object. For example, I control a couple of tags called “ntoll/rating” and “ntoll/comment” which I could attach to any of the objects representing boingboing.net posts. By tagging an object with associated values I’m indicating what I thought about the post.

Importantly, I know which object I want to tag because it has a special unique tag called “about” whose value is the URL to the boingboing.net post in question. Other people who want to add information about this post will know to use the same object as me because the about tag-value tells them, er, what the object is about.

This brings me to the killer point: accessing data from boingboing.net is good, but the facility to annotate, discover and re-use everyone’s data about boingboing.net posts is better. That’s why we sometimes say we’re trying to do to databases what Wikipedia did to encyclopaedias.

Users of Fluidinfo don’t have to retrieve information about boingboing.net posts by building queries using just boingboing.net tags. It’s possible to search using other people’s tags. For example, here’s how to search for posts where I’ve given it a relatively high rating and added a comment:

ntoll/rating > 6 and has ntoll/comment and
has boingboing.net/title

And users don’t have to just ask for boingboing.net related tag-values either. It’s possible to ask objects for all their tags that you have permission to see. For example, you could retrieve a matching post’s title, body, author and any comments I make about the post with the ntoll/comment tag.

I’m only scratching the surface here so I’ll follow up with another post soon with some example code and use cases. In the meantime, if you want to find out more feel free to get in touch with us. We’re more than happy to help.

If you’re a developer and want to play with the boingboing.net data you should take a read of my last post explaining how to explore Fluidinfo’s API with Python.

In case you were wondering, it really was only half an evening’s work to prepare the data and write the import script. 🙂

Note: The import is currently running but should be complete later this afternoon. Not all posts will be in Fluidinfo yet (so far we have everything up to the end of September 2008).

Image credits: Diagram generated by abouttag written by Nick Radcliffe and the “API Sign” is © 2006 ulybug under a Creative Commons license.

January 14, 2011

Exploring FluidDB with fluiddb.py

Filed under: Howto,Programming — Nicholas Tollervey @ 10:27 am

FluidDB.py is a Python module based upon work by Seo Sanghyeon. The module has been extracted, extended and unit-tests were added by me (Nicholas Tollervey).

This post leads you from signing up to FluidDB to executing commands and queries using fluiddb.py. It assumes you’re already familiar with the concepts behind FluidDB and that you’re a developer looking to experiment with the API. If you’re not familiar or need a refresher take a look at the following slides:

We’ll be using Python but don’t assume any familiarity with that language. So lets get started…

When you sign up for FluidDB the following steps happen:

In order to access the API with your new credentials you need to use basic HTTP authentication over SSL (i.e. the URI starts with “https”). Obviously, using the raw API with a browser or tools such as curl or wget isn’t practical for most people. Hence the need for fluiddb.py as a wrapper (there are lots of API wrappers for FluidDB in many different languages, check out our list of libraries on our website for more information).

Installing fluiddb.py is as simple as typing:

$ pip install -U fluiddb.py

or

$ easy_install fluiddb.py

or, if you want to install from source:

$ git clone https://github.com/ntoll/fluiddb.py.git
$ cd fluiddb.py
$ python setup.py install

Simply import fluiddb to get started. The following Python terminal session demonstrates what I mean:

$ python
Python 2.6.5 (r265:79063, Apr 16 2010, 13:09:56)
[GCC 4.4.3] on linux2
Type "help", "copyright", "credits" or "license" for more information.
>>> import fluiddb

The fluiddb.instance variable indicates which instance of FluidDB the module is using (it defaults to the main instance – the sandbox can be used for the purposes of testing/experimentation). Make use of the fluiddb.MAIN and fluiddb.SANDBOX “constants” to change instance as shown below.

>>> fluiddb.SANDBOX
'https://sandbox.fluidinfo.com'
>>> fluiddb.instance = fluiddb.SANDBOX
>>> fluiddb.MAIN
'https://fluiddb.fluidinfo.com'
>>> fluiddb.instance = fluiddb.MAIN

Use the login and logout functions to, er, login and logout (what did you expect..?):

>>> fluiddb.login('username', 'password')
>>> fluiddb.logout()

The most important function provided by the fluiddb module is call(). You must supply at least the HTTP method and path as the first two arguments to a call to the REST API. For example, the following call gets information about Terry Jones:

>>> fluiddb.call('GET', '/users/terrycojones')
({'status': '200', 'content-length': '69', 'content-location': 'https://fluiddb.fluidinfo.com/users/terrycojones', 'server': 'nginx/0.7.65', 'connection': 'keep-alive', 'cache-control': 'no-cache', 'date': 'Fri, 14 Jan 2011 15:15:51 GMT', 'content-type': 'application/json'}, {u'name': u'Terry Jones', u'id': u'05eee31e-fbd1-43cc-9500-0469707a9bc3'})

Notice how call() returns a tuple containing two items:

  • The header dictionary
  • The content of the response (if there is any)

Often it is simply better to do the following:

>>> headers, content = fluiddb.call('GET', '/users/test')

So the response headers get put into the “headers” variable and the actual content of the response is found in the “content” variable.

It is also possible to send the path as a list of path elements:

>>> headers, content = fluiddb.call('GET', ['about','yes/no','test','foo'])

Which will ensure that each element is correctly percent encoded even if it includes problem characters like slash: ‘/’ (essential for using the “about” based API).

If the API involves sending json data to FluidDB simply send the appropriate Python dict object and fluiddb.py will “jsonify” it appropriately for you:

>>> headers, content = fluiddb.call('POST', '/objects', body={'about': 'an-example'})

If the body argument isn’t a Python dictionary then you must be HTTP PUTting a tag-value on an object. In which case, it’s possible to set the mime-type of the value passed in body:

>>> headers, content = fluiddb.call('PUT', '/about/an-example/test/foo', body='<html><body>Hello, World!</body></html>', mime='text/html')

If you’re PUTting a primitive value then the fluiddb.py will automatically provide the correct mime-type for you:

>>> headers, content = fluiddb.call('PUT', '/about/an-example/test/foo', 12345)

To send URI arguments simply append them as arguments to the call() method:

>>> headers, content = fluiddb.call('GET', '/permissions/namespaces/test', action='create')

The “action = ‘create'” argument will be turned into “?action=create” appended to the end of the URL sent to FluidDB.

Furthermore, if you want to send some custom headers to FluidDB (useful for testing purposes) then supply them as a dictionary via the custom_headers argument:

>>> headers, content = fluiddb.call('GET', '/users/test', custom_headers={'Origin': 'http://foo.com'})

Finally, should you be sending a query via the /values endpoint then you can supply the list of tags whose values you want returned via the tags argument. For example, the following call will return the about-tag value and the twitter screen name of those twitter users I have met in the real world:

>>> headers, content = fluiddb.call('GET', '/values', tags=['fluiddb/about', 'twitter.com/users/screen_name'], query='has ntoll/met')

If this walkthrough isn’t enough then check out the three screencasts below. I made them a few months ago so I’m demonstrating an older version of fluiddb.py but it’s pretty much unchanged (only the implementation details described in part two have changed a little).

Using FluidDB’s RESTful API with fluiddb.py (Part 1)

Using FluidDB’s RESTful API with fluiddb.py (Part 2)

Using FluidDB’s RESTful API with fluiddb.py (Part 3)

As always, if you have any question, encounter problems or simply want to give us feedback, get in touch!

January 10, 2011

Introducing the Fluidinfo Explorer

Filed under: Awesomeness,Howto — Nicholas Tollervey @ 9:09 am

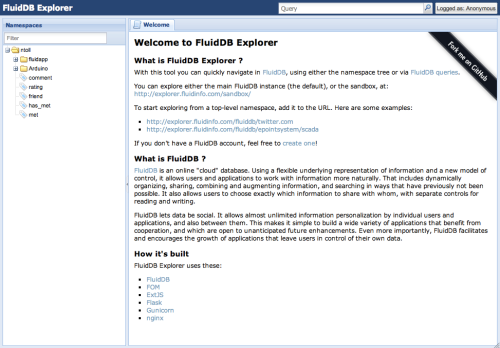
Normally users will use applications that use Fluidinfo and are unaware that the application is using Fluidinfo. Programmers will use Fluidinfo through its API. So, what if you’re a non-programmer and not using an application and you just want to have a look around inside Fluidinfo? Pier-Andre Parent has written the Fluidinfo Explorer – a web-based “explorer” GUI. If you’re not a developer, this is probably your best way of starting to interact with Fluidinfo without having to get into all the nitty-gritty details of the API. It’s like the file-system explorer you find on Windows, Mac or Linux.

We’ve found the Explorer so useful that we’ve made it available via the explorer.fluidinfo.com name. The URL you visit in your browser is very important. The pattern is http://explorer.fluidinfo.com/INSTANCE/NAMESPACE where INSTANCE is either “fluidinfo” or “sandbox” and NAMESPACE is name of the user, organisation or application you’re interested in. For example, the following link will display my (ntoll’s) top-level namespace in the explorer: http://explorer.fluidinfo.com/fluidinfo/ntoll

The result will look something like the following:

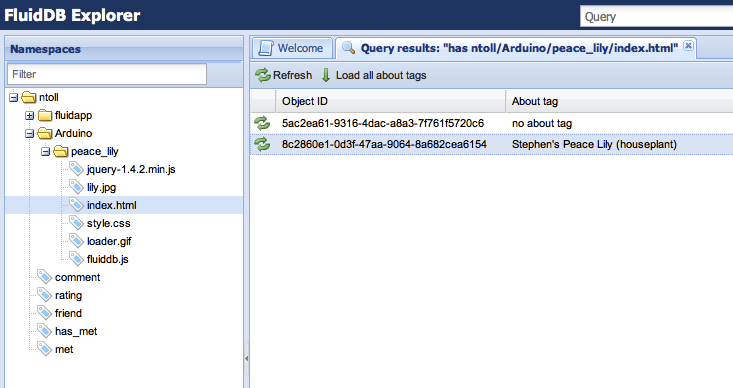
Notice how the namespace / tag structure is displayed in a collapsable tree control on the left hand side. The main body of the user interface contains a helpful welcome message and at the top right hand side is a search box for queries written in Fluidinfo’s query language and the login button.

Right click a namespace or tag to view and update its attributes, to create and delete namespaces and tags, and to set permissions on them. Clicking on a tag in on the left hand side fills the main area of the UI with all the objects that it has tagged:

So far, so simple…

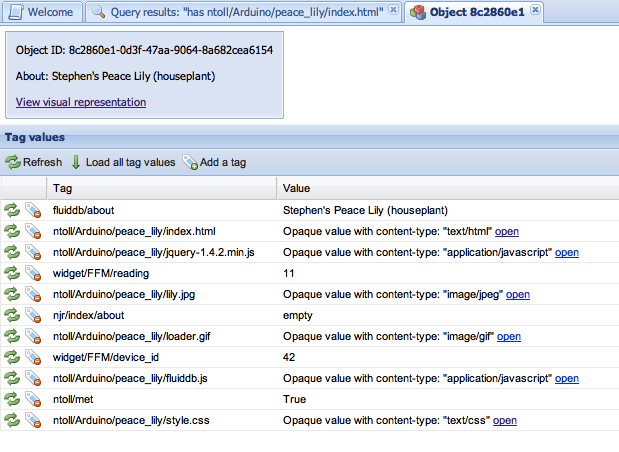
But what about exploring the tags on a specific object? Click on an objects object id in the result set to display a list of all the tags attached to it. Click “Load all tag values” to display the associated values. Notice how the explorer differentiates between primitive (numbers, booleans, strings etc..) and opaque (images, audio, binary files etc…) values – primitive values are displayed whereas the cells for opaque values contain a description of the type of value stored in Fluidinfo:

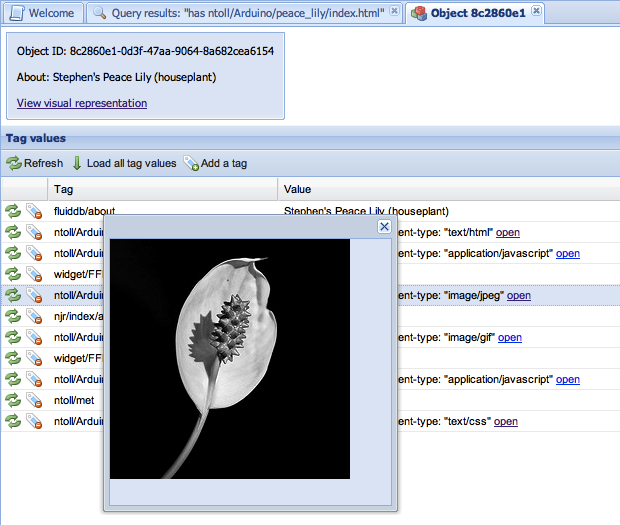
Click the “open” link next to each of the opaque tag value to trigger a pop-up with the opaque value presented therein. In this example the value is an image:

Finally, if you follow the “View visual representation” link a rather nice graphical representation of the object is presented to you:

These diagrams are automatically generated by yet another third party application created by Nicholas Radcliffe and hosted on Google’s AppEngine. Given an appropriate URL a rather cool image is generated, e.g., http://abouttag.appspot.com/id/butterfly/8c2860e1-0d3f-47aa-9064-8a682cea6154.

The great thing about the explorer is that it provides an intuitive and visual representation of how Fluidinfo is structured. Have fun exploring!

Powered by WordPress